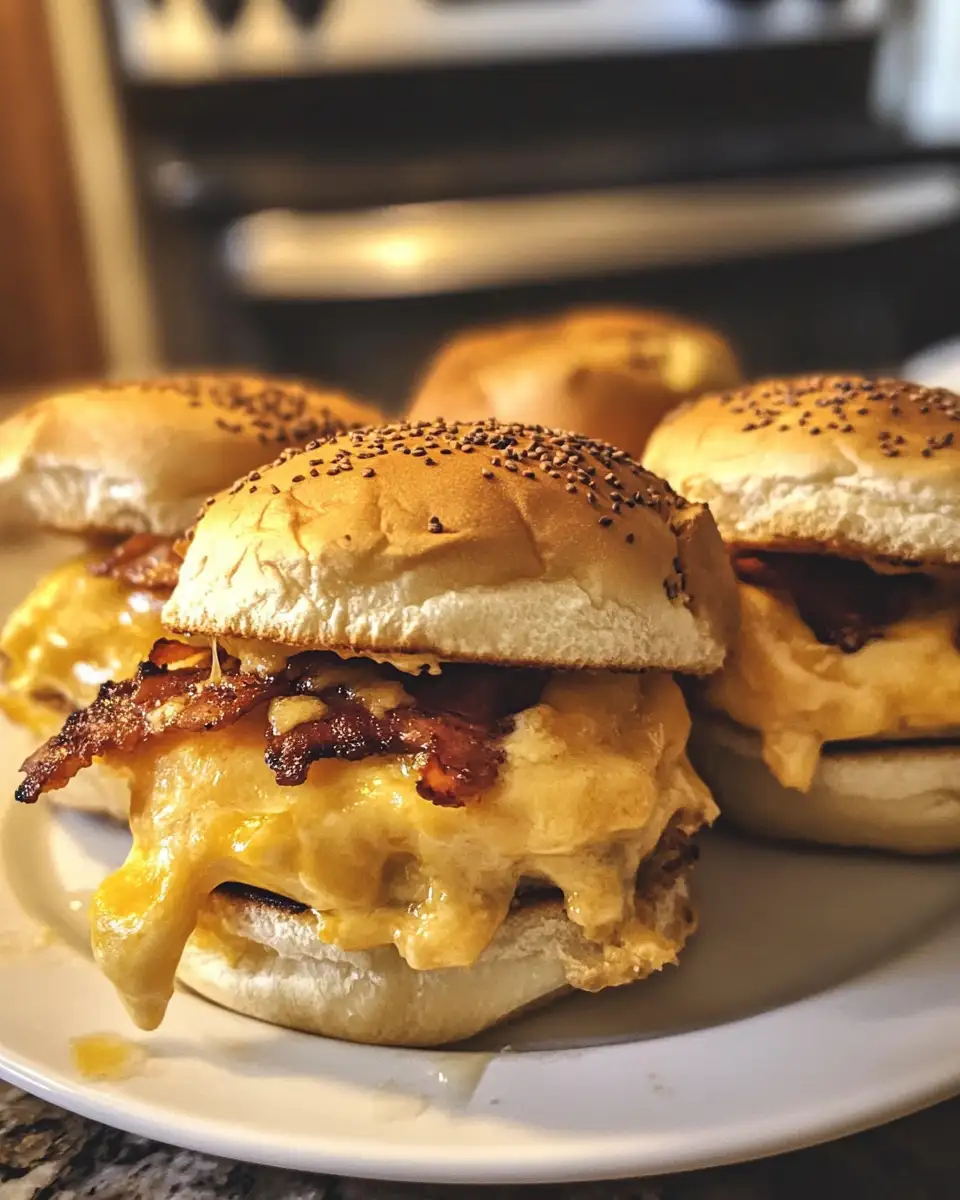
There’s something so wonderfully cozy about waking up to a batch of warm, cheesy breakfast sliders. They’ve become a favorite in my household, especially on busy mornings when Emma and Noah are eager to dig into something comforting but quick. These little sliders aren’t just a meal — they’re a way to bring a sprinkle of love and togetherness to our hectic mornings. The gooey cheese, fluffy eggs, and savory sausage wrapped in soft rolls make every bite a tiny celebration. If you’re looking for a breakfast that feels like a hug and fits perfectly into your morning rush, these Cheesy Breakfast Sliders might just become your new go-to.
Table of Contents
Why You’ll Love This Cheesy Breakfast Sliders
What makes these Cheesy Breakfast Sliders stand out for me is how effortlessly they blend comfort with convenience. First, they’re incredibly kid-friendly — my two little ones adore pulling apart the cheesy layers and savoring each bite. Second, they’re perfect for meal prep; I often make a batch on Sunday and reheat them during the week for quick breakfasts. Lastly, the combination of fluffy scrambled eggs, melty cheese, and savory sausage inside soft rolls hits that perfect balance of flavors and textures that keep everyone coming back for more. These sliders have truly become my secret weapon for busy mornings that still feel special.
Ingredients You’ll Need for This Cheesy Breakfast Sliders
Choosing the right ingredients is key to making these sliders pop with flavor. I always reach for fresh eggs and quality breakfast sausage because they set the foundation for this dish. Soft, buttery slider buns are essential, too — they soak up all that cheesy goodness without falling apart. Whenever possible, I use real cheddar cheese for that sharp, melty texture, but feel free to swap in mozzarella or Monterey Jack if you prefer a milder taste. The beauty of this recipe is how flexible it is, allowing you to customize it to your family’s favorite flavors.
- 12 slider buns (soft and fresh, like Hawaiian rolls)
- 8 large eggs
- 1 cup shredded sharp cheddar cheese (or your choice of cheese)
- 1 pound breakfast sausage (pork or turkey, depending on preference)
- 2 tablespoons butter
- Salt and pepper, to taste
- Optional: 1/4 cup chopped green onions or fresh herbs for garnish
Nutrition Facts
- Calories: Approximately 350 per slider
- Protein: 18g
- Fat: 22g (includes saturated fat from cheese and sausage)
- Carbohydrates: 20g
- Fiber: 1g
- Sugar: 3g (mostly from the buns)
- Sodium: 600mg

Melted Magic Cheesy Breakfast Sliders You Need to Try
Learn how to make delicious Cheesy Breakfast Sliders. Easy recipe with step-by-step instructions.
- Total Time: 45 minutes
- Yield: 4 servings 1x
Ingredients
Choosing the right ingredients is key to making these sliders pop with flavor. I always reach for fresh eggs and quality breakfast sausage because they set the foundation for this dish. Soft, buttery slider buns are essential, too — they soak up all that cheesy goodness without falling apart. Whenever possible, I use real cheddar cheese for that sharp, melty texture, but feel free to swap in mozzarella or Monterey Jack if you prefer a milder taste. The beauty of this recipe is how flexible it is, allowing you to customize it to your family’s favorite flavors.
- 12 slider buns (soft and fresh, like Hawaiian rolls)
- 8 large eggs
- 1 cup shredded sharp cheddar cheese (or your choice of cheese)
- 1 pound breakfast sausage (pork or turkey, depending on preference)
- 2 tablespoons butter
- Salt and pepper, to taste
- Optional: 1/4 cup chopped green onions or fresh herbs for garnish
Instructions
- Preheat your oven to 350°F (175°C). Lightly grease a 9×13-inch baking dish to hold the sliders.
- Cook the breakfast sausage in a large skillet over medium heat. Break it apart with a spatula, cooking until browned and cooked through, about 7-8 minutes. Drain any excess fat and set aside.
- In a bowl, whisk the eggs with salt and pepper. Melt butter in the skillet over medium-low heat, then pour in the eggs. Gently scramble, stirring slowly to keep them soft and fluffy. Remove from heat just before fully set.
- Slice the slider buns horizontally, keeping the top and bottom halves intact.
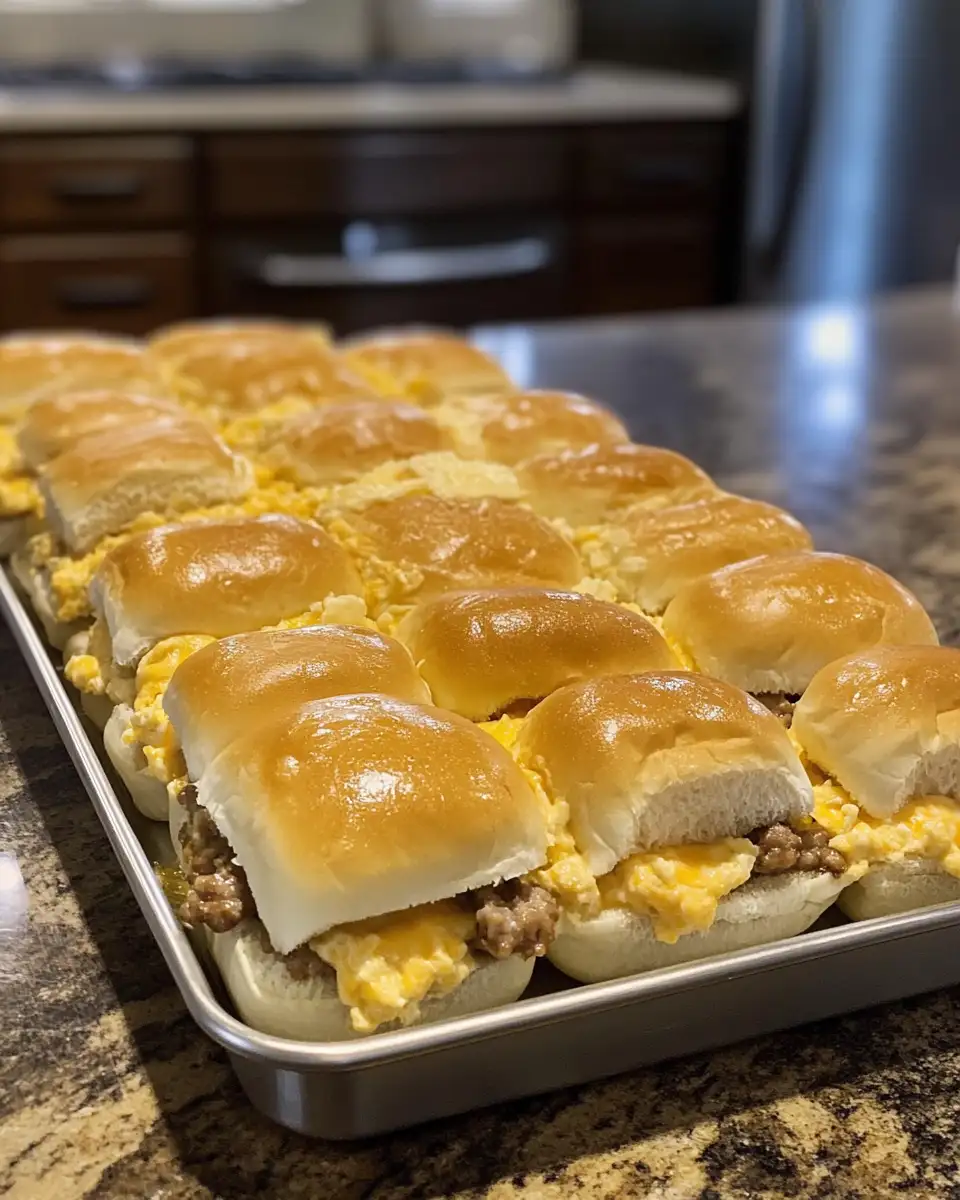
- Layer the bottom half of the buns in the baking dish. Spread the cooked sausage evenly over the buns, followed by the scrambled eggs. Sprinkle cheese generously over the eggs, then place the top halves of the buns on.
- Cover the dish with foil and bake for 15 minutes, until the cheese is melted and the sliders are warmed through.
- Remove the foil and bake uncovered for another 5 minutes to let the tops crisp slightly.
- Optional: Garnish with chopped green onions or fresh herbs before slicing into individual sliders.
- Prep Time: 15 minutes
- Cook Time: 30 minutes
- Category: Main Dish
- Method: Cooking
- Cuisine: International
Keywords: Cheesy Breakfast Sliders, recipe, cooking, food
Steps to Create Your Cheesy Breakfast Sliders
- Preheat your oven to 350°F (175°C). Lightly grease a 9×13-inch baking dish to hold the sliders.
- Cook the breakfast sausage in a large skillet over medium heat. Break it apart with a spatula, cooking until browned and cooked through, about 7-8 minutes. Drain any excess fat and set aside.
- In a bowl, whisk the eggs with salt and pepper. Melt butter in the skillet over medium-low heat, then pour in the eggs. Gently scramble, stirring slowly to keep them soft and fluffy. Remove from heat just before fully set.
- Slice the slider buns horizontally, keeping the top and bottom halves intact.
- Layer the bottom half of the buns in the baking dish. Spread the cooked sausage evenly over the buns, followed by the scrambled eggs. Sprinkle cheese generously over the eggs, then place the top halves of the buns on.
- Cover the dish with foil and bake for 15 minutes, until the cheese is melted and the sliders are warmed through.
- Remove the foil and bake uncovered for another 5 minutes to let the tops crisp slightly.
- Optional: Garnish with chopped green onions or fresh herbs before slicing into individual sliders.
Tips for Making the Best Cheesy Breakfast Sliders
Perfecting these sliders is all about paying attention to a few simple details. I learned early on that the quality of your sausage and eggs makes a noticeable difference. Using freshly cracked eggs and a flavorful sausage can elevate this dish from good to unforgettable. Also, don’t overcook the eggs — keeping them soft and moist makes for a creamier filling that melts beautifully with the cheese.
- Use a non-stick skillet to scramble eggs gently without browning.
- Choose slider buns that are slightly sweet and soft, like Hawaiian rolls, for a perfect balance.
- Layer ingredients evenly to ensure every slider has a good amount of sausage, egg, and cheese.
- If you like a little kick, add a pinch of smoked paprika or a few dashes of hot sauce to the eggs.
- Cover with foil during baking to trap steam and melt the cheese without drying out the buns.
With these tips, you’ll create a restaurant-quality dish every time. Learn more: related recipe Learn more: Decadent Chocolate Espresso Banana Bread Recipe You Need to Try
Serving Suggestions and Pairings

Cheesy Breakfast Sliders shine on busy mornings but also make a delightful addition to brunch gatherings or weekend family breakfasts. I often serve them with a side of fresh fruit or a light green salad dressed with lemon vinaigrette to balance the richness. For a heartier meal, pair them with crispy roasted potatoes or even a refreshing glass of freshly squeezed orange juice.
- Serve with a colorful fruit salad for a fresh contrast
- Pair with roasted breakfast potatoes or sweet potato hash
- Offer alongside a cup of your favorite coffee or iced tea
- Garnish with fresh herbs like parsley or chives for a pop of color
- Add sliced avocado or tomato on the side for added creaminess and freshness
These sliders have become a staple on our weekend brunch table, especially when friends come over. They’re always a crowd-pleaser, and I love how easy it is to customize them depending on the season or what’s in the fridge.
Storage and Reheating Tips
Keeping these sliders fresh and tasty for later is simple with the right approach. I often make a double batch so that we have breakfasts ready to go during the busy school week. Proper storage and gentle reheating help maintain their soft texture and melty cheese without drying them out.
- Store leftover sliders in an airtight container in the refrigerator for up to 3 days
- Reheat in the oven at 325°F (160°C) wrapped in foil for 10-15 minutes
- Alternatively, microwave individual sliders covered with a damp paper towel for 45-60 seconds
- For longer storage, freeze sliders individually wrapped in plastic wrap, then place in a freezer bag for up to 1 month
- Thaw frozen sliders overnight in the fridge before reheating
Frequently Asked Questions
What are the main ingredients for Cheesy Breakfast Sliders?
The main ingredients for Cheesy Breakfast Sliders include the items listed in our ingredients section above. Each ingredient plays a crucial role in achieving the perfect flavor and texture.
How long does it take to make Cheesy Breakfast Sliders?
The total time to make Cheesy Breakfast Sliders includes both preparation and cooking time. Check the recipe card above for exact timing details.
Can I make Cheesy Breakfast Sliders ahead of time?
Yes, Cheesy Breakfast Sliders can often be prepared in advance. Store it properly in an airtight container in the refrigerator and consume within the recommended timeframe.
What can I serve with Cheesy Breakfast Sliders?
Cheesy Breakfast Sliders pairs well with various sides and accompaniments. Consider the serving suggestions mentioned in the recipe for the best dining experience.
Is Cheesy Breakfast Sliders suitable for special diets?
Depending on the ingredients used, Cheesy Breakfast Sliders may be adapted for various dietary needs. Check the ingredients list and consider substitutions as needed for your dietary requirements.
Final Thoughts
I hope these Cheesy Breakfast Sliders bring as much joy and ease to your mornings as they have to mine. They’re a delicious way to start the day, especially when time is tight but you still want something homemade and filling. Please let me know how your sliders turn out — I love hearing your stories and tweaks. Happy cooking, friends!