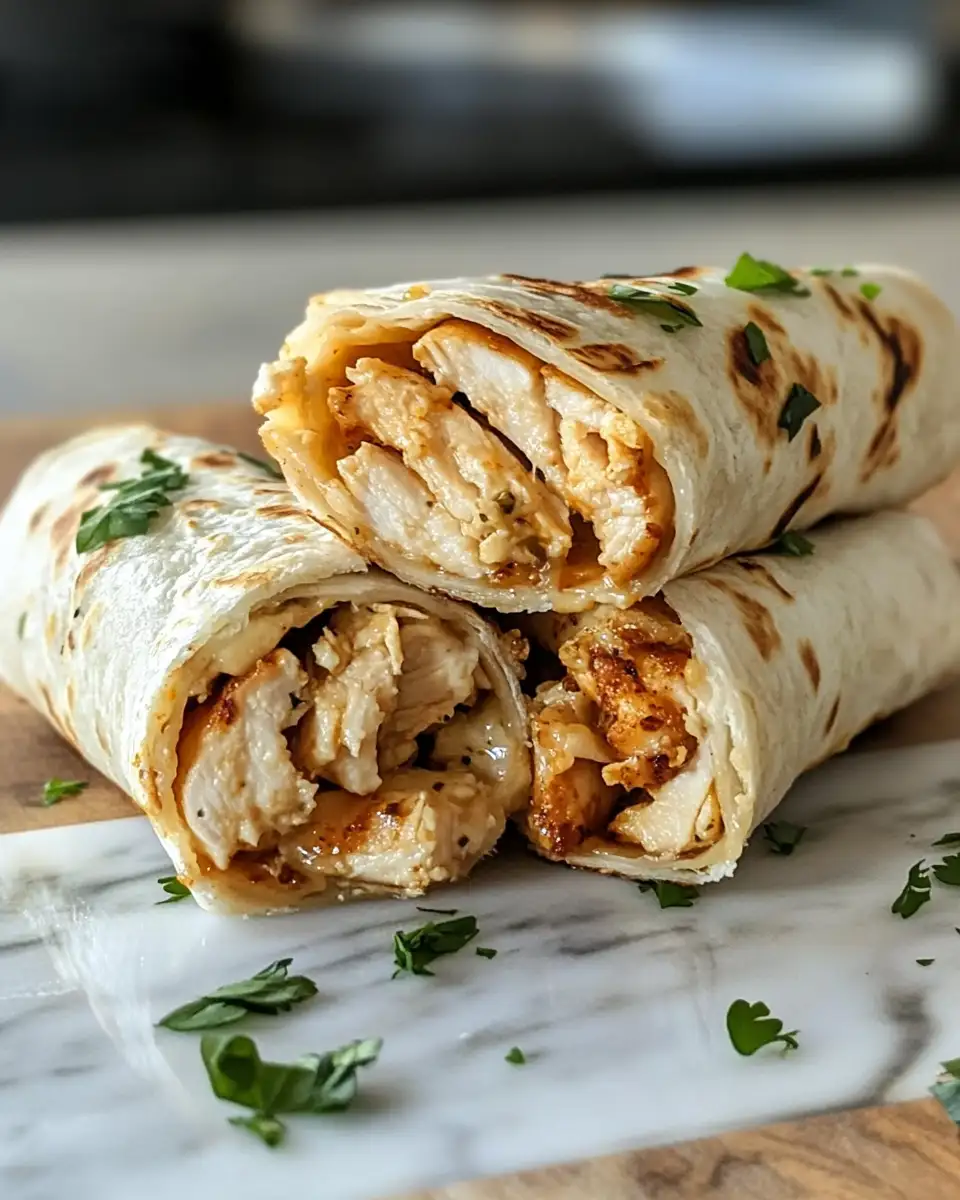
There’s something truly comforting about Melty Garlic Chicken Wraps with Cheese — the way the warm, garlicky chicken mingles with gooey cheese, all wrapped up in a soft tortilla feels like a little hug on your plate. As a busy mom, I’ve learned that meals like this are a game-changer: quick to make, yet full of flavor and family-friendly appeal. These wraps have saved many of my hectic weeknights, turning rushed dinners into moments where Emma, Noah, and I slow down and savor something truly satisfying together.
Table of Contents
Why You’ll Love This Melty Garlic Chicken Wraps with Cheese
This recipe is a personal favorite because it strikes the perfect balance between convenience and comfort. First, the melty cheese adds a luscious creaminess that transforms simple chicken into something special. Plus, the garlic seasoning is bold without overwhelming, making it a hit with both kids and adults. I also appreciate how easily adaptable it is — whether you’re working with leftovers or fresh ingredients, this wrap comes together quickly, freeing up time to enjoy with your family. It’s a reminder that great meals don’t have to be complicated to be memorable.
Ingredients You’ll Need for This Melty Garlic Chicken Wraps with Cheese

The key to this dish lies in selecting the right ingredients that bring out the best flavors without fuss. From my years in the kitchen, I’ve learned that fresh garlic and quality cheese make a world of difference here. I always reach for fresh chicken breasts or thighs — their juiciness is essential — and a good melting cheese like mozzarella or Monterey Jack to get that irresistible stretch. If you’re short on time, pre-cooked rotisserie chicken works beautifully too.
- 2 large chicken breasts (about 1 lb), thinly sliced
- 3 cloves garlic, minced
- 1 tablespoon olive oil
- 1 teaspoon smoked paprika
- 1/2 teaspoon salt
- 1/4 teaspoon black pepper
- 4 large flour tortillas (8-inch)
- 1 1/2 cups shredded mozzarella or Monterey Jack cheese
- 1/2 cup chopped fresh spinach or lettuce (optional)
- 1/4 cup sour cream or Greek yogurt (optional, for serving)
Substitution tip: For a dairy-free option, try a vegan cheese alternative, and swap the flour tortillas for gluten-free wraps if needed. You can also add sautéed mushrooms or bell peppers for extra veggie goodness.
Nutrition Facts
- Calories: Approximately 380 per wrap
- Protein: 35g
- Fat: 15g
- Carbohydrates: 30g
- Fiber: 2g
- Sugar: 2g
- Sodium: 550mg

Melty Garlic Chicken Wraps with Cheese That Will Melt Your Heart
Learn how to make delicious Melty Garlic Chicken Wraps with Cheese. Easy recipe with step-by-step instructions.
- Total Time: 45 minutes
- Yield: 4 servings 1x
Ingredients
The key to this dish lies in selecting the right ingredients that bring out the best flavors without fuss. From my years in the kitchen, I’ve learned that fresh garlic and quality cheese make a world of difference here. I always reach for fresh chicken breasts or thighs — their juiciness is essential — and a good melting cheese like mozzarella or Monterey Jack to get that irresistible stretch. If you’re short on time, pre-cooked rotisserie chicken works beautifully too.
- 2 large chicken breasts (about 1 lb), thinly sliced
- 3 cloves garlic, minced
- 1 tablespoon olive oil
- 1 teaspoon smoked paprika
- 1/2 teaspoon salt
- 1/4 teaspoon black pepper
- 4 large flour tortillas (8-inch)
- 1 1/2 cups shredded mozzarella or Monterey Jack cheese
- 1/2 cup chopped fresh spinach or lettuce (optional)
- 1/4 cup sour cream or Greek yogurt (optional, for serving)
Substitution tip: For a dairy-free option, try a vegan cheese alternative, and swap the flour tortillas for gluten-free wraps if needed. You can also add sautéed mushrooms or bell peppers for extra veggie goodness.
Instructions
- Heat the olive oil in a large skillet over medium heat. Add the minced garlic and sauté for about 30 seconds until fragrant, being careful not to burn it.
- Add the thinly sliced chicken to the skillet. Season with smoked paprika, salt, and black pepper. Cook for 5-7 minutes, stirring occasionally, until the chicken is cooked through and slightly golden.
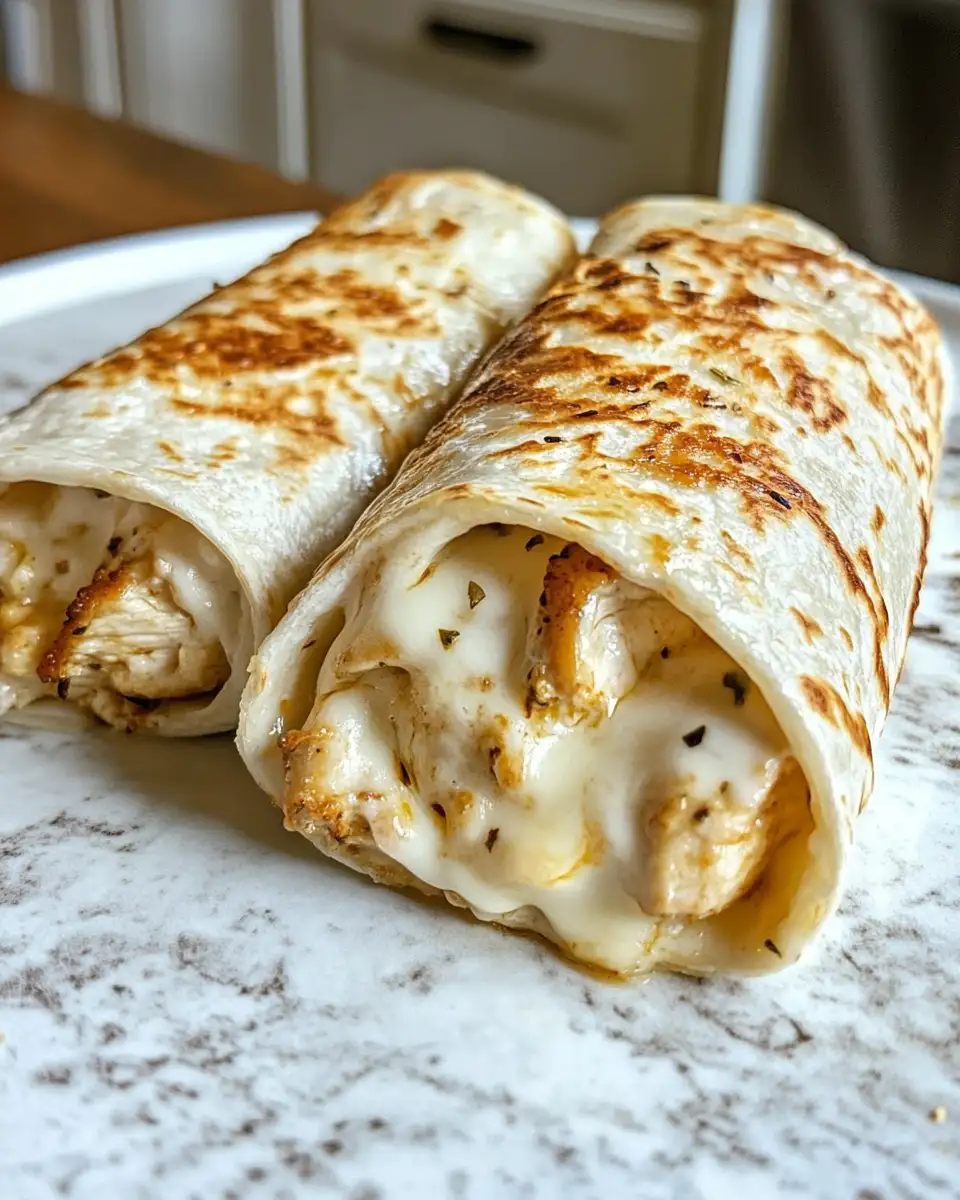
- Lower the heat and sprinkle the shredded cheese evenly over the chicken. Cover the skillet with a lid and let the cheese melt for about 2-3 minutes.
- While the cheese melts, warm the tortillas briefly in a dry pan or microwave so they’re pliable and easy to roll.
- Assemble the wraps by spooning the cheesy garlic chicken onto each tortilla. Add fresh spinach or lettuce if you like a little crunch and freshness.
- Roll up the tortillas tightly, folding in the sides as you go. For extra melty goodness, return the wraps to the skillet and press gently for 1-2 minutes per side, creating a golden, slightly crispy exterior.
- Serve warm with a dollop of sour cream or Greek yogurt on the side, and enjoy!
- Prep Time: 15 minutes
- Cook Time: 30 minutes
- Category: Main Dish
- Method: Cooking
- Cuisine: International
Keywords: Melty Garlic Chicken Wraps with Cheese, recipe, cooking, food
Steps to Create Your Melty Garlic Chicken Wraps with Cheese
- Heat the olive oil in a large skillet over medium heat. Add the minced garlic and sauté for about 30 seconds until fragrant, being careful not to burn it.
- Add the thinly sliced chicken to the skillet. Season with smoked paprika, salt, and black pepper. Cook for 5-7 minutes, stirring occasionally, until the chicken is cooked through and slightly golden.
- Lower the heat and sprinkle the shredded cheese evenly over the chicken. Cover the skillet with a lid and let the cheese melt for about 2-3 minutes.
- While the cheese melts, warm the tortillas briefly in a dry pan or microwave so they’re pliable and easy to roll.
- Assemble the wraps by spooning the cheesy garlic chicken onto each tortilla. Add fresh spinach or lettuce if you like a little crunch and freshness.
- Roll up the tortillas tightly, folding in the sides as you go. For extra melty goodness, return the wraps to the skillet and press gently for 1-2 minutes per side, creating a golden, slightly crispy exterior.
- Serve warm with a dollop of sour cream or Greek yogurt on the side, and enjoy!
Tips for Making the Best Melty Garlic Chicken Wraps with Cheese
Getting this wrap just right is all about layering flavors and textures thoughtfully. Over the years, I’ve found a few little tricks that elevate this simple meal into a true crowd-pleaser.
- Use fresh garlic — it gives the chicken a vibrant, aromatic kick that pre-minced garlic just can’t match.
- Slice the chicken thinly and uniformly so it cooks quickly and evenly, perfect for weeknight dinners.
- Don’t rush melting the cheese — covering the pan traps steam and ensures a gooey, even melt.
- Warm your tortillas before assembling to prevent cracking and make wrapping a breeze.
- For a flavor boost, add a pinch of smoked paprika or chili powder to the chicken seasoning — it adds subtle smokiness without heat.
- Pressing the wraps in the skillet after assembly gives you a delightful contrast of crispy outside and melty inside.
With these tips, you’ll create a restaurant-quality dish every time. Learn more: Chimichurri Grilled Chicken Bowl
Serving Suggestions and Pairings
This dish is incredibly versatile and works beautifully for various occasions, from casual family dinners to spontaneous weekend lunches. I’ve often served these wraps with simple sides to keep the focus on the rich, garlicky chicken and cheese filling.
- Pair with a crisp white wine or sparkling water with lemon for a refreshing contrast.
- Serve alongside a fresh green salad tossed with a light vinaigrette to balance the richness.
- Offer a side of homemade sweet potato fries or roasted veggies for heartier meals.
- For a fun twist, add a spoonful of mango salsa or avocado slices inside the wrap.
Whether it’s a busy weeknight or a laid-back weekend, these wraps have become a staple in my household — they’re easy to share, satisfying, and always leave us wanting more.
Storage and Reheating Tips
Proper storage ensures you can enjoy leftovers just as much as the fresh dish, which is a lifesaver for busy parents like me.
- Store leftover wraps in an airtight container in the refrigerator for up to 3 days.
- When reheating, add a splash of water or a tiny bit of olive oil to a skillet over medium-low heat to keep the chicken moist and the cheese smooth.
- Avoid microwaving if possible, as it can make the tortillas soggy and the cheese rubbery. Instead, reheat gently on the stove, flipping often.
- If you want to prep ahead, cook the chicken filling in advance and assemble wraps just before serving to keep tortillas fresh.
Frequently Asked Questions
What are the main ingredients for Melty Garlic Chicken Wraps with Cheese?
The main ingredients for Melty Garlic Chicken Wraps with Cheese include the items listed in our ingredients section above. Each ingredient plays a crucial role in achieving the perfect flavor and texture.
How long does it take to make Melty Garlic Chicken Wraps with Cheese?
The total time to make Melty Garlic Chicken Wraps with Cheese includes both preparation and cooking time. Check the recipe card above for exact timing details.
Can I make Melty Garlic Chicken Wraps with Cheese ahead of time?
Yes, Melty Garlic Chicken Wraps with Cheese can often be prepared in advance. Store it properly in an airtight container in the refrigerator and consume within the recommended timeframe.
What can I serve with Melty Garlic Chicken Wraps with Cheese?
Melty Garlic Chicken Wraps with Cheese pairs well with various sides and accompaniments. Consider the serving suggestions mentioned in the recipe for the best dining experience.
Is Melty Garlic Chicken Wraps with Cheese suitable for special diets?
Depending on the ingredients used, Melty Garlic Chicken Wraps with Cheese may be adapted for various dietary needs. Check the ingredients list and consider substitutions as needed for your dietary requirements.
Final Thoughts
Melty Garlic Chicken Wraps with Cheese are one of those recipes that bring warmth and ease into the kitchen, especially when life feels hectic. I hope you find as much joy in making and sharing these wraps with your loved ones as I do with mine. Don’t forget to let me know how yours turn out — I love hearing your stories from the kitchen!