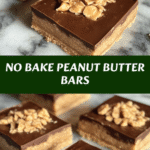
There’s something truly magical about no bake treats, especially when they involve peanut butter — the rich, creamy kind that melts in your mouth and fills your kitchen with that irresistible nutty aroma. No Bake Peanut Butter Bars have become my go-to for those moments when I want a quick, satisfying dessert that doesn’t tie me down in the kitchen. Between school runs, soccer practice, and bedtime stories with Emma and Noah, these bars give me a sweet win without the fuss. They’re simple enough for the kids to help with, which means more laughter and less stress — just how I like it.
Table of Contents
Why You’ll Love This No Bake Peanut Butter Bars
These No Bake Peanut Butter Bars are a game-changer for busy families like mine. They come together in minutes, no oven required, which means I can whip them up while juggling homework and dinner prep. The texture hits that perfect balance between chewy and creamy, thanks to the peanut butter and the crunchy cereal base. Plus, they’re a nostalgic nod to the kind of homemade treats my mom used to make, bringing that warm, comforting feeling straight to our home. They’re also endlessly adaptable, so you can tweak them to suit your family’s tastes or pantry staples.
Ingredients You’ll Need for This No Bake Peanut Butter Bars
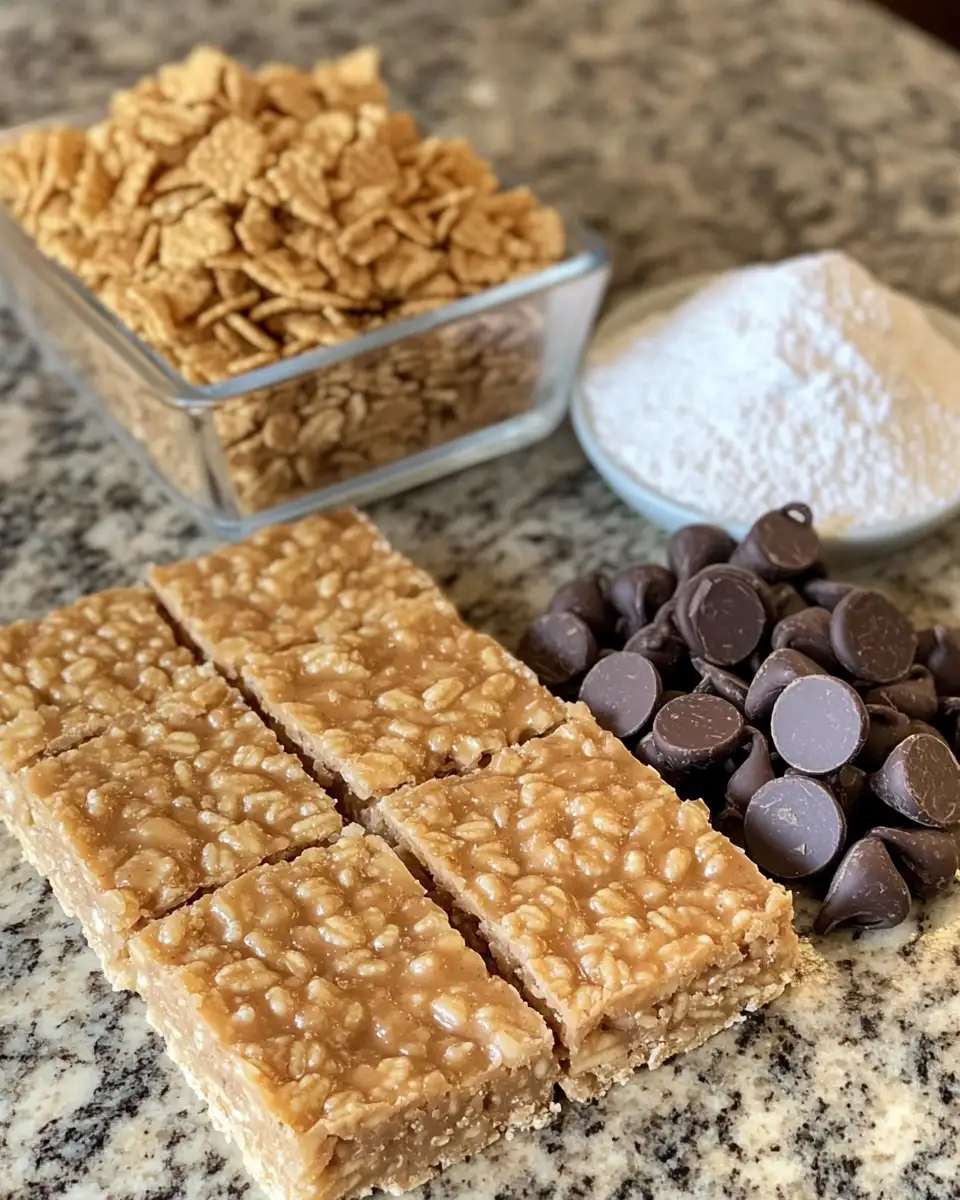
The key to this dish lies in selecting the right ingredients — fresh, high-quality peanut butter makes all the difference. I always opt for natural peanut butter with just peanuts and a pinch of salt, avoiding those loaded with added sugars or oils. This keeps the bars tasting rich but not overly sweet. For the base, crispy rice cereal adds a lovely crunch and lightness, balancing the creamy peanut butter perfectly. When choosing your chocolate topping, I recommend using semi-sweet chips for that classic, slightly bittersweet contrast, but feel free to swap in dark or milk chocolate depending on your preference.
- 1 cup natural creamy peanut butter (no added sugar)
- 1/2 cup unsalted butter, melted
- 2 cups powdered sugar
- 2 cups crispy rice cereal
- 1 1/2 cups semi-sweet chocolate chips
- 1 teaspoon vanilla extract
Nutrition Facts
- Calories: Approximately 250 per bar (based on 12 bars)
- Protein: 6g
- Fat: 18g
- Carbohydrates: 18g
- Fiber: 2g
- Sugar: 12g
- Sodium: 120mg
Irresistible No Bake Peanut Butter Bars You Can Make in Minutes
Learn how to make delicious No Bake Peanut Butter Bars. Easy recipe with step-by-step instructions.
- Total Time: 45 minutes
- Yield: 4 servings 1x
Ingredients
The key to this dish lies in selecting the right ingredients — fresh, high-quality peanut butter makes all the difference. I always opt for natural peanut butter with just peanuts and a pinch of salt, avoiding those loaded with added sugars or oils. This keeps the bars tasting rich but not overly sweet. For the base, crispy rice cereal adds a lovely crunch and lightness, balancing the creamy peanut butter perfectly. When choosing your chocolate topping, I recommend using semi-sweet chips for that classic, slightly bittersweet contrast, but feel free to swap in dark or milk chocolate depending on your preference.
- 1 cup natural creamy peanut butter (no added sugar)
- 1/2 cup unsalted butter, melted
- 2 cups powdered sugar
- 2 cups crispy rice cereal
- 1 1/2 cups semi-sweet chocolate chips
- 1 teaspoon vanilla extract
Instructions
- Line an 8×8-inch baking dish with parchment paper, leaving some overhang for easy removal later.
- In a large bowl, mix the melted butter and peanut butter together until smooth and well combined. This is a great time to take a little taste — it’s the heart of your bars!
- Stir in the powdered sugar and vanilla extract, blending until fully incorporated. The mixture will thicken and become slightly crumbly.
- Gently fold in the crispy rice cereal, making sure every bit is coated but still keeping the cereal’s crunch.
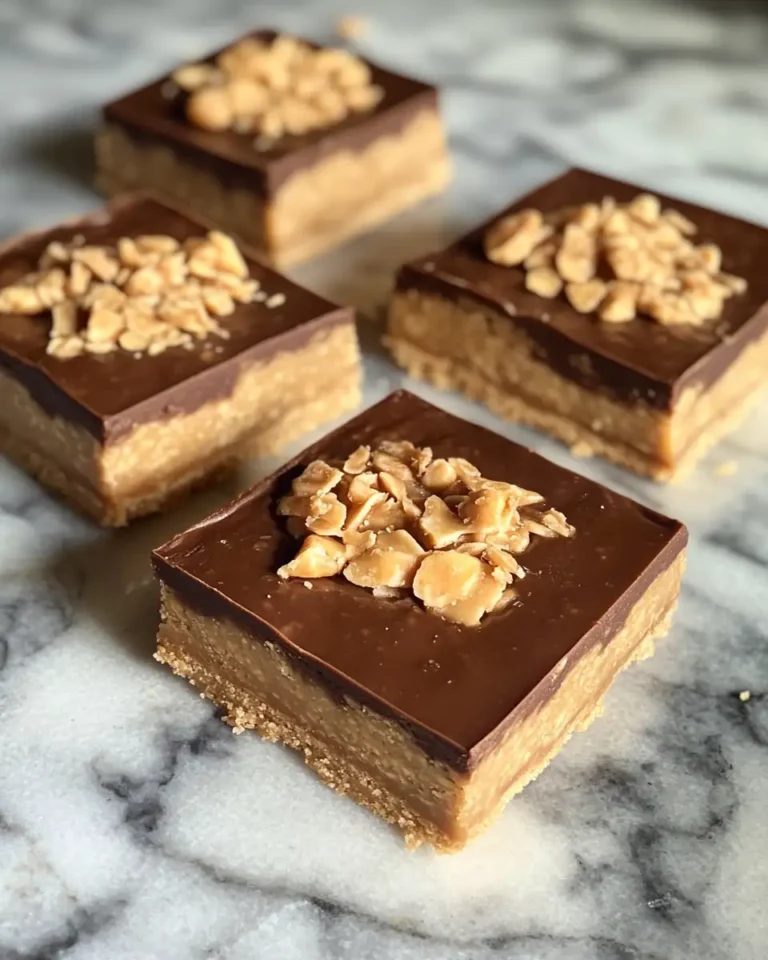
- Press the mixture firmly and evenly into the prepared pan. I like to use the back of a spatula or even clean hands to get a smooth, compact layer.
- In a microwave-safe bowl, melt the chocolate chips in 30-second intervals, stirring well between each, until glossy and smooth.
- Pour the melted chocolate over the peanut butter layer, spreading it evenly with a spatula.
- Refrigerate for at least 2 hours, or until the bars are firm and the chocolate is set.
- Lift the bars out using the parchment paper edges and cut into squares. For clean cuts, dip your knife in hot water and wipe it dry between slices.
- Prep Time: 15 minutes
- Cook Time: 30 minutes
- Category: Main Dish
- Method: Cooking
- Cuisine: International
Keywords: No Bake Peanut Butter Bars, recipe, cooking, food
Steps to Create Your No Bake Peanut Butter Bars
- Line an 8×8-inch baking dish with parchment paper, leaving some overhang for easy removal later.
- In a large bowl, mix the melted butter and peanut butter together until smooth and well combined. This is a great time to take a little taste — it’s the heart of your bars!
- Stir in the powdered sugar and vanilla extract, blending until fully incorporated. The mixture will thicken and become slightly crumbly.
- Gently fold in the crispy rice cereal, making sure every bit is coated but still keeping the cereal’s crunch.
- Press the mixture firmly and evenly into the prepared pan. I like to use the back of a spatula or even clean hands to get a smooth, compact layer.
- In a microwave-safe bowl, melt the chocolate chips in 30-second intervals, stirring well between each, until glossy and smooth.
- Pour the melted chocolate over the peanut butter layer, spreading it evenly with a spatula.
- Refrigerate for at least 2 hours, or until the bars are firm and the chocolate is set.
- Lift the bars out using the parchment paper edges and cut into squares. For clean cuts, dip your knife in hot water and wipe it dry between slices.
Tips for Making the Best No Bake Peanut Butter Bars
Getting these bars just right is all about technique and attention to detail. I’ve learned over the years that the quality of peanut butter and the way you press the mixture into the pan can make a big difference in texture and taste.
- Use natural peanut butter without added oils or sugars for a cleaner, richer flavor.
- Make sure the butter is fully melted but not hot when mixing — this helps everything combine smoothly.
- Don’t skip pressing the mixture firmly; this ensures the bars hold together well and cut neatly.
- When melting chocolate, go slow in short bursts to avoid burning and maintain a silky finish.
- Chill the bars long enough — rushing this step can lead to crumbly bars that don’t slice well.
With these tips, you’ll create a treat that’s as satisfying to make as it is to eat. Learn more: related recipe Learn more: Irresistible Blueberry Swirl Yogurt Bites That Make Snacking Fun
Serving Suggestions and Pairings
This recipe shines as a quick afternoon pick-me-up or a sweet finish to a casual family meal. I often make a batch on busy weekends when Emma and Noah want to help in the kitchen — it’s a wonderful way to slow down and connect. Plus, they love sharing these bars with their friends at school.
- Serve slightly chilled with a glass of cold milk or a creamy iced coffee
- Pair with fresh fruit like sliced bananas or strawberries for a refreshing balance
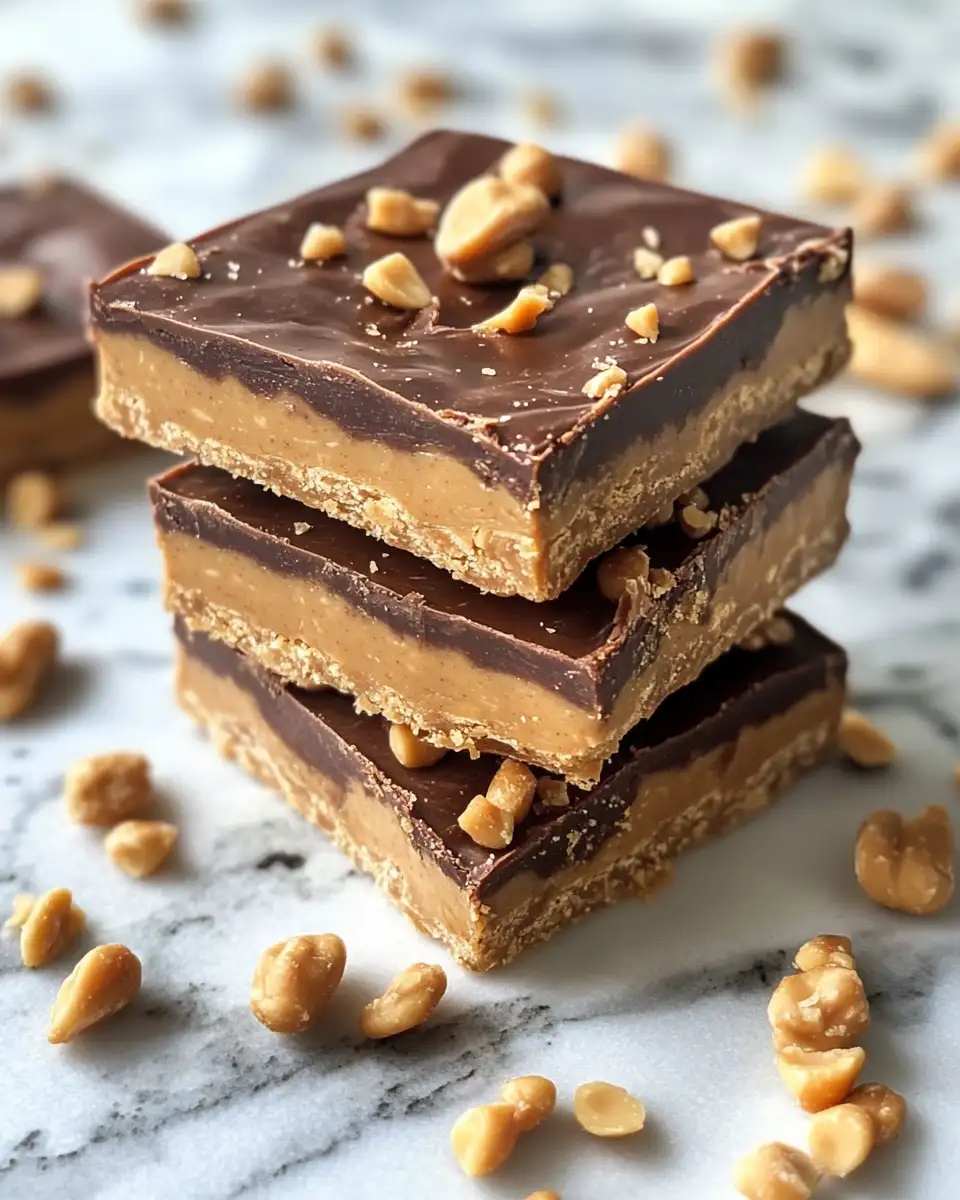
- Top with a sprinkle of sea salt or chopped nuts for extra texture and flavor
- Offer alongside a warm cup of tea or hot cocoa for cozy evenings
These bars are a crowd-pleaser, perfect for lunchboxes, potlucks, or just a little indulgence on a busy day. They bring a little sweetness and joy without any fuss.
Storage and Reheating Tips
Proper storage keeps these bars tasting fresh and delicious, especially when you want to make them ahead for a busy week.
- Store bars in an airtight container in the refrigerator for up to one week
- For longer storage, freeze bars wrapped tightly in plastic wrap and foil for up to 3 months
- Thaw frozen bars in the fridge overnight before serving
- No reheating needed — these bars are best enjoyed cold or at room temperature for that perfect chewy texture
Frequently Asked Questions
What are the main ingredients for No Bake Peanut Butter Bars?
The main ingredients for No Bake Peanut Butter Bars include the items listed in our ingredients section above. Each ingredient plays a crucial role in achieving the perfect flavor and texture.
How long does it take to make No Bake Peanut Butter Bars?
The total time to make No Bake Peanut Butter Bars includes both preparation and cooking time. Check the recipe card above for exact timing details.
Can I make No Bake Peanut Butter Bars ahead of time?
Yes, No Bake Peanut Butter Bars can often be prepared in advance. Store it properly in an airtight container in the refrigerator and consume within the recommended timeframe.
What can I serve with No Bake Peanut Butter Bars?
No Bake Peanut Butter Bars pairs well with various sides and accompaniments. Consider the serving suggestions mentioned in the recipe for the best dining experience.
Is No Bake Peanut Butter Bars suitable for special diets?
Depending on the ingredients used, No Bake Peanut Butter Bars may be adapted for various dietary needs. Check the ingredients list and consider substitutions as needed for your dietary requirements.
Final Thoughts
These No Bake Peanut Butter Bars have become one of my family’s favorite treats — quick, easy, and full of that homemade love I cherish. If you give them a try, I’d love to hear how they turn out and any fun twists you add. Here’s to sweet moments and simple joys in your kitchen!